|  |  |
     
|
| 888-826-2043 |  |  |
| |
 |
| INSTRUCTIONS A-8
Use with GLAP Part # 2080 Piper PA-23-250 & PA-E23-250
One Piece Windshield Installation
Instructions | | |
. | STC# | Used on | | SA585GL | PA-23-250, PA-E23-250 ( 6 Place ) |
|
 |
| |
Materials List: - Windshield - part # as shown above
- 4 pcs. #4-¼ PTA sheet metal screws
- 8 pcs. AN-526-632-R 10 screws
- 8 pcs. AN-364 or 365 632 nuts
- 8 pcs. M-1000-1 elastomer bushings
- 1 pc .060" X 1" X 12" Aluminum strip
- Bracket part # M-1003 or cover part # M-1002. as required
- Sealant - dichromate putty or silicone rubber( RTV ) or other approved sealant --NOT SUPPLIED--
|
 |
| |
Installation Procedure: - Remove compass ( if mounted on center post) and OAT. Remove necessary upholstery and trim.
- Remove old windshield by removing centerouter strip and lower fairing. Remove the screws on the top and sidesand remove the old windshields.
- Cover the top of the instrument panel toprevent foreign material from entering radios and instruments.
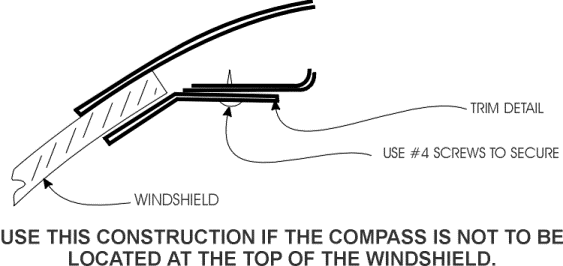
- Remove center post by drilling out the necessaryrivets and removing the bolt at the bottom, if the compass is to be locatedother than shown in Fig 1 of these instructions see Fig 2. If thecompass is to be located at the top of the windshield, cut the post asshown on Fig 1 and remove the bolt at the bottom.
| Fig 1 |  | | | | Fig 2 | | | - Clean the old sealant from the windshield mountingarea and carefully inspect and repair the mounting area to remove nicks,burrs and distorted metal as required.
- Remove the edge of the protective paperas shown in Fig 3.
| Fig 3 |  | - Fit the new windshield to the opening bytrimming - use a disk sander or a belt sander - be careful not to removetoo much material ( you can not put any back on, but you can always removea little more ). When the windshield fits properly, mark and drillor notch the holes at the top and sides for the screws ( see Fig 4 ). -- NOTE: The bottom of the windshield should fit tightly against the skinas it helps to hold the windshield in position. --
See Drilling and trimming instructions formore information. | Fig 4 |  | - With the windshield and lower fairing in place,locate and drill the 4 holes in the lower fairing an thru the windshieldand aluminum strip. BE SURE TO FOLLOW THEDRILL SHARPENING INSTRUCTIONS, a #27 drill is used through thefairing and the aluminum strip. A .312" drill is used to drill thewindshield using the smaller hole as a pilot hole. 6 or 8 holes maybe used along the lower fairing ( rather than 4 ), if it seems necessaryto keep the windshield from leaking in this area. The 2" screw spacingis typical and AN 960 washers should be used on the outer holes - beyondthe 12" strip. (See Fig 5)
| Fig. 5 |  | - Remove the windshield and smooth all edgeswith fine sandpaper. Install the elastomer bushings in the holesat the bottom.
- Apply sealant to all mounting surfacesand reinstall the windshield in the opening. Reinstall the lowerfairing and the other related fasteners. ( see Fig 6 )
| Fig 6 |  | - Clean the excess sealant and windshield( VM&P Naphtha or lighter fluid will not harm the Plexiglas but mostother solvents will ). Use a good grade of aircraft windshield cleanerto remove the thin film that will remain after cleaning the sealant withthe VM&P Naphtha.
- Re install the O.A.T. - it may be installedthrough the windshield, but it is desirable to relocate it elsewhere. Reinstall the compass as shown in Fig 7 or relocate as desired. A C2400L4Pmay be mounted on top of the instrument panel.
| Fig 7 |  | - Repair painted areas and replace upholstery( as required )
- Fill out 337 form.
|
| 888-826-2043 |  |  |
| | 
Price and availability are subject to change without notice. Mistakes happen, mistaken prices will not be honored. Add Shipping, processing, handling and insurance. | |


