![]()


888-826-2043
| Compass Mount Instructions |
|
Cessna Compass Mount
|
||
|
1) Using a
router is the best way to remove a compass mount from an existing scrap
windshield. Set the router so that the depth cut is about 1/64"
less the thickness of the windshield material - you do not want to cut
through the windshield into the compass mount you are trying to save.
This step may be done in stages using a deeper cut for each cutting
stage. Cut the windshield in the area over the compass mount.
When the material holding the compass mount is very thin ( about 1/64"
or less ) the mount may be easily broken out without damage to the
mount. (See Fig 1)
Fig 1 |
2) With the compass mount removed carefully remove the remaining material from the old windshield using a file or sander. (see trimming instructions for some ideas)
1) Locate the spot where the compass mount is to be attached to the new windshield and mark it with a china marker. Check the shape and fit of the compass mount to the area it is to be attached, and reshape it as necessary using a file or sander. Be sure that the compass mount is suitable for reuse - inspect it for cracks and stripped threads.
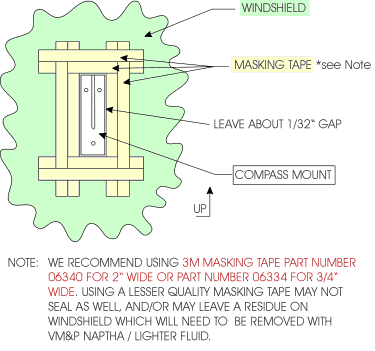
2) Carefully mask with masking
tape, around the area where the mount is to be glued to the windshield
to protect the windshield from the adhesive, as the adhesive will
damage the surfaces if it comes into contact with them. BE SURE TO
MASK CAREFULLY AS THE MOUNT SHOULD BE STRAIGHT WHEN INSTALLED, AND IF THE
TAPE IS NOT CORRECT THE MOUNT CANNOT BE ATTACHED IN THE PROPER LOCATION.
|
|
3) Protect all surfaces where the adhesive may drip or may be smeared with newspapers, rags or other suitable disposable covering.
4) Apply a sufficient amount of adhesive to the surface to be bonded, and press the compass mount into place. Using a pop-cicle stick or wooden stirrer remove the excess glue from the edges where it has squeezed out. A couple of pieces of masking tape may be needed to keep the mount from moving until the adhesive starts to set. Q NOTE: SEE BELOW FOR RECOMMENDED ADHESIVES!!.
5) When the adhesive is dry ( about 24 hrs. ) remove the tape, and attach the compass in the normal manner.
![]()
IPS WELD-ON 16
mfg. by
Industrial Polychemical Service
P.O. Box 471
Gardena, CA. 90247
3M PLASTIC AND EMBLEM ADHESIVE part #
08061
mfg. by
Adhesives, Coatings and Sealers Division
3M Company
St. Paul, MN. 55144
888-826-2043
|
|||
|
|