

888-826-2043
| A-4 STC'd Windshield Installation Instructions |
INSTRUCTIONS A-4
|
One Piece Windshield Installation
|
||
|
|
|
|
|
Serial #'s | Weight and balance information | |
| Weight # | Moment in. # | ||||
| 170, A & B |
|
|
ALL | + 3.8 | + 65 |
| 172 & A |
|
|
28000 ~ 47746 | + 3.8 | + 65 |
| 172 B & C |
|
|
47747 ~ 49544 | + 3.8 | + 65 |
| 175, A, B, & C |
|
|
55001 ~ 57119 | + 3.8 | + 65 |
| 180 |
|
|
30000 ~ 31261 | + 3.8 | + 65 |
| 180, 180A |
|
|
31261 ~ 50355 | No change | No change |
| 180, 180B, 180C, 180D, 180E, 180F, 180J, 180K |
|
|
50356 & up | No change | No change |
| 182, 182A, |
|
|
33000 ~ 51556 | No change | No change |
| 182B, 182C, 182D |
|
|
51557 ~ 53598 | No change | No change |
| 182E, 182F, 182G |
|
|
53559 ~ 55844 | +4.4 | + 75 |
| 185, 185A, 185B, 185C, 185D, 185E, A185E, A185F |
|
|
0001 & up | No change | No change |
| 210-5 (205), 210-5A (205A) |
|
|
All | +4.4 | + 75 |
| 206, & U206, |
|
|
0001 ~ U0437 | +4.4 | + 75 |
| P206 |
|
|
P0001 ~ 0160 | +4.4 | + 75 |
| 210 |
|
|
57841 ~ 58715 | + 4.4 | + 75 |
Materials:
1. 1 Windshield as noted above2. 4 felt strips (1pc M-1001-2 46.5", 2 pcs M-1001-1 18.5", 1 pc M-1001-1 76.5")
3. 4 elastomer Bushings ( M-1001-1 )
4. 4 pcs, AN-526-632R10 screws
5. 4 pcs, AN-364-632 nuts
6. Sealant - optional - not supplied
7. Miscellaneous hardware ( rivets, etc. ) - not supplied
Instructions (removal of Cessna Windshield Center strip)
1. Remove center strip ( both inner and outer)
2. Remove lower fairing and wing root fairings
3. remove old windshield by sliding the windshield forward out of the top and side channels
4. Clean channels and mounting surfaces that will contact the windshield. straighten and repair as required. any nicks or distorted metal that will contact the windshield.
5. Place the new windshield in position and check the fit of the windshield - trim if required. See trimming instructions.
6. Again Place the windshield in position and temporarily attach the lower fairing and wing fairings so that the windshield is held in the exact final position.
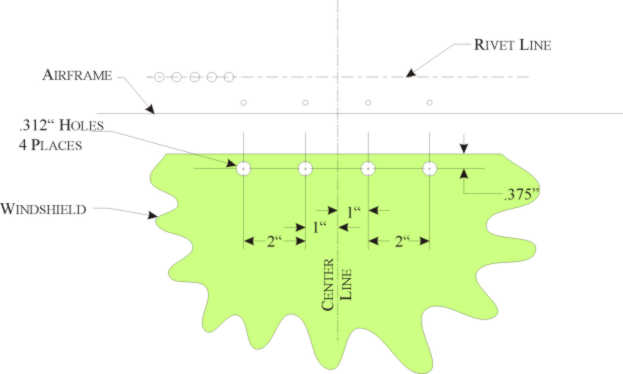
7. Remove the protective paper from the double stick tape in the drill template and carefully locate the template on the top of the windshield and over the top of the upper channel, aligning the template with the marks on the windshield. Check the edge distance of the holes to the edge of the skin- it should be at least 1/4 inch. Mark the hole locations carefully. A No. 27 drill may be used to start the hole in the skin and thus leaving a mark. It is important that this step be done very carefully as the alignment of the holes depends on it.
8. Remove the template and the windshield and finish drilling (with a No. 27 drill) the 4 holes thru the outer and inner walls of the top channel as marked. Remove any burrs and chips that the drilling created.
9 Install the 4 bushings in the holes and attach the self-adhesive felt strips in the windshield. Cut small holes thru the felt to allow the screws to go through the 4 bushings.
10 Place the windshield in position and install the 4 screws and nuts. Tighten the screws lightly, they should be only finger tight and should not distort the metal skin. Over-tightening can cause crazing and premature failure of the windshield.
11 Reinstall the lower fairing and wing root fairings. (Note: sealant may be used in addition to the felt to help prevent leakage.)
12 Fill the holes remaining from the center strip attachment points using the screws and nuts (AN-526 and AN 364) or rivets.
13 Touch up or paint as needed.
14 Relocate compass as desired. A C-2400L4P compass may be located on top of the instrument panel or a standard compass in the instrument panel.
15. New Weight and balance information (see above)
16. Fill out 337 form
NOTE: Some models have the outside air temperature gauge through the center strip of the windshield - this can be moved to the wing root air vent as is common in other Cessna models.
 |

. |
 |
888-826-2043
|
|||
|
|
