![]()


888-826-2043
| A1A STC'd Windshield Installation Instructions |
|
Instructions for Installing
|
Use with GLAP Part # 2090
|
PAGE
INDEX: Go to: Beech
56 Series
|
2. 69 pieces AN 507 or 526-632 R9, 10, 11, 12, 13, or 14
( See note below)
69 pieces AN 364-632 (nuts)
69 pieces AN 960-6L (washers)
3. Masking Tape
4. Can of spray Enamel
5. RTV Silicone Rubber Sealant GE, Dow or equal
6. Optional - VM&P Naphtha or Lighter Fluid
1. Phillips screw drivers
2. Electric drill
3. Drill set
4. Counter sink tool
5. 5/16 inch box end wrench
6. Sander -Disk or Belt ( may be done by hand if necessary )
1. Remove old Windshield and clean opening of old sealant. Inspect opening for distorting or damaged surface where new windshield will contact.
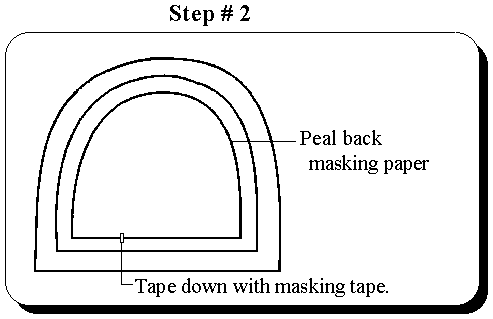
2. Peel the protective paper back on the new windshield not more than 1 to 2 inches from the edge and use masking tape to hold it.
3. Place new Windshield in opening and mark any spots that have to be sanded for a better fit. ( see trimming instructions ) DO NOT REMOVE EXCESSIVE AMOUNTS OF MATERIAL AT ONE TIME - you can always take more off - you cannot put any back on! Do not use tools such as screwdrivers to pry the windshield out - use your fingers and hands.
4. Make sure the edges of the windshield are smooth and then replace the windshield in the opening. If any interference still exists repeat step #3
NOTE: The AN 526 screws may be used in holes that are not dimpled (
countersunk ) use as required. Some models may need a few screws
longer than the -9 thru -14 I.E. the attachment of the defroster may used
longer screws - use as required ( screw lengths of 9& 10 normally used
with .250" windshield, -11 & 12 normally used with .375 windshield
and -13 & 14 with the .500" windshield.
I.E. the attachment of the defroster outlet - use as required
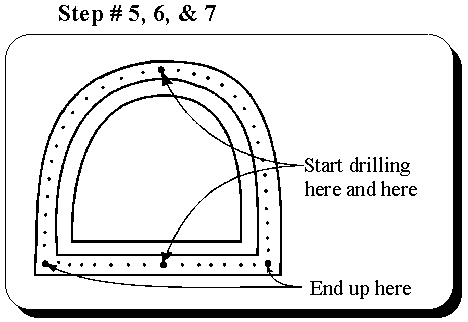
5. When a good fit is obtained, have someone inside the aircraft hold the windshield in position and drill the top center hole (from the outside) with a drill (see sharpening instructions) that will just clear the airframe. Place a screw through the hole and a nut inside and tighten very gently. Now drill the bottom center hole and place a screw through and a nut and tighten gently. DO NOT OVER TIGHTEN
6. Drill four or five more holes on both sides of the center, top an bottom, working from the center out. Place the screws in the outer most holes that you have just drilled and tighten gently. DO NOT OVER TIGHTEN!
7. Repeat the process (step 6) until all holes are drilled and there is one screw and nut in every forth or fifth hole.
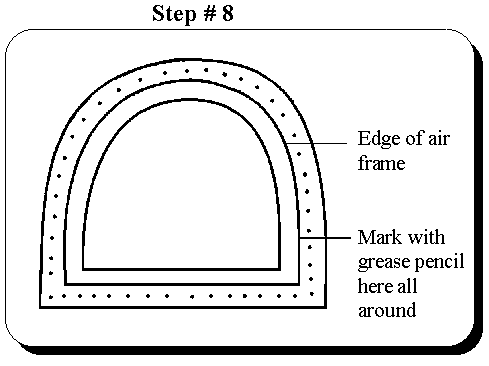
8. Mark the windshield with a grease pencil ( china marker ) to show where the edge of the airframe meets the windshield.
9. Remove the screws in the reverse order ( outside in ) and remove the windshield from the opening.
10. Mask the Windshield 1/8 inch past the mark from step 8 leaving the outer edge of the opening exposed ( approximately 1/2 inch ).

11. Redrill all the holes with a 3/16 to 7/32 drill ( see sharpening instruction ) and countersink slightly to clear the dimpled countersunk holes in the airframe (countersink windshield only on the side that contacts the airframe).

12. Clean the edge of chips of dirt, spray a very light coat of enamel on the exposed (1/2 inch or so as in step 10) on the side that contacts the airframe. (NOTE: inspect masking first to be sure no paint will get on the plastic except for the edge). This coating is necessary as RTV Silicone Rubber will not adhere well to Acrylic.
13. When the paint on the edge is dry remove the extra masking tape and replace windshield in airframe. (no screws yet)
14. Squeeze a bead of RTV Silicone Rubber between the windshield and the airframe.
15. Put the screws and nuts in by starting in the center and working out. DO NOT OVER TIGHTEN work Quickly - as the silicone rubber starts to "skin" over in 10 to 20 minutes
16. When all the screws and nuts are in place go over all of them - tighten gently and back off 1/4 to 1/2 turn on each of them.
17. The windshield is now permanently installed - excess RTV Silicone Rubber ( the excess that should squeeze out ) may be wiped off and then cleaned with a rag dampened with VM&P Naphtha or lighter fluid ( don't use too much ).
17a. Or optionally the excess may be allowed to harden for a day or
two and then peeled off as it will not adhere well to the acrylic. Don't
use a knife as you may cut into the windshield causing a stress concentration.
|
|
| Windshield - replace 96-420029-1 or -3 or 96-420030-1 or -3
or 002-430051-1 or -3 with W-, W/T-, W/G-2090 Net weight change................................... - 0 ( exchange ) Moment................................................... -0 |
| Windshield - replace 96-420029-1 or -3 or 96-420030-1 or -3
or 002-430051-1 or -3 with W-, W/T-, W/G-2090-375 Net weight change................................. + 8.25# ( exchange ) Arm ................................................. ..........67" Moment................................................... + 553 in. lbs. |
| Windshield - replace 96-420029-1 or -3 or 96-420030-1 or -3
or 002-430051-1 or -3 with W-, W/T-, W/G-2090-500 Net weight change................................... + 16.5# ( exchange ) Arm ........................................................ 67" Moment................................................... + 1106 in. lbs. |
Note: The above information is based on average weights for the windshields. Actual weight & balance data should be determined individually for each airframe windshield combination.
888-826-2043
|
|||
|
|